When I first made the decision on creating the costume as a whole. I asked myself if I should paint my own design or find something similar online. After searching, I found a website that had their own line of balaclavas. I ordered off them here. As you can see. The skull design is pretty good and the art style was done pretty nicely. However, my personal picky-ness made me not enjoy it as much as I anticipated. The balaclava was way too short. Here's what I noticed
 The design/style of the skull is the same but there are its flaws. As you can see, the cheek bone is not aligned as nicely as the one from the game. The nose looks retarded when I put the mask on. The chin part of the design (red) is lower than my actual chin line(blue). The game has it slightly above. With all these bothering me on a very accurate costume AND!! also finding someone else having it on cosplay.com, it was time to go to plan B: Design my own.
I found a plain black balaclava on ebay. It wasn't anything fancy...it only cost me a dollar or so. The balaclava itself measures 14" from head to neck which is pretty good but i wish it was 2 inches longer for personal preference...that or my head is too big ANYWAY!! here we go.
 I took a (white) pencil crayon and marked the spots that bothered me on the one i ordered. It looked like that when I finished.
 I then sketched out the outline of the skull using the concept artbook that came with the prestige edition as reference.
 I bought fabric paint and mixed white and yellow together to make a...LOL a yellowish white? LOL HAHA wtf. well its just the base colour. The reason for this is because I was gonna use white more of a highlight colour rather than a main. besides...i don't think actual bone is white white anyway :P in yo face bitches!
 I started applying the paint using a small paintbrush onto the mask. LOL at buckteeth ghost...and that's all i did to apply the base colour. Paint between the lines
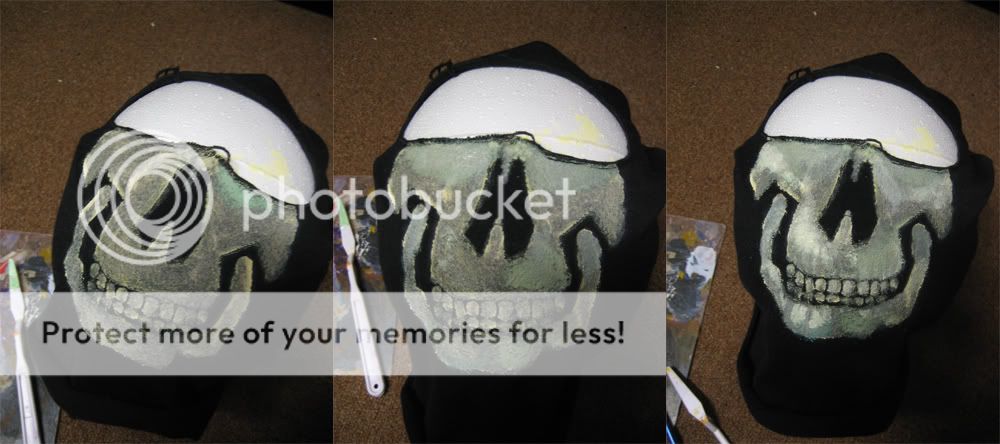 1 week later...LOL i got lazy. Just wait for it to dry so you can start applying the detailing layer ontop. I used the 2 colours as before but included BLUE. to create a green-ish colour. I started using it as my shadows. I realized after that these werent as dark as I might have wanted it to be. As expected so I just mixed regular acrylic to the fabric colour paints I was already using. It turned out pretty nicely. I painted these with the reference help of the book.
 detailing layer turned out like this. Im quite happy with it. Its not perfectly done/painted so it gives more of an edgy feel.
 This is how it looks like when the glasses are on and headset. :)
thanks for reading my first "tutorial". I know it wasn't much of one. But at least it shows some sort of process and I'm sure you can do this on your own if you felt like it + had the materials to do so. :) Let me know what you think
btw. i am aware this has nothing to do with photoshop like how the first post stated that i would be doing those tutorials. AHH :( I'll work on them...I've had a request from a friend on how to blend photographs/images so maybe I'll do that one for her :D
